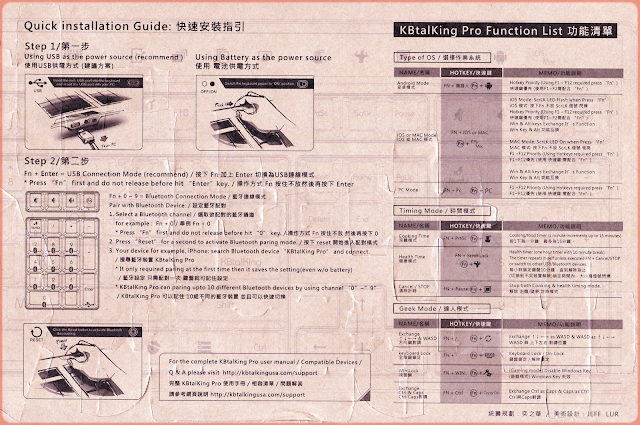
If you have a KBTalking Pro USB + Bluetooth mechanical keyboards and you have forgotten the setup steps, the following quick start guide may help you.
Technical Notes
for my pet projects
Saturday, June 6, 2020
KBTalking Pro Quickstart guide
If you have a KBTalking Pro USB + Bluetooth mechanical keyboards and you have forgotten the setup steps, the following quick start guide may help you.
Monday, May 25, 2020
wireshark foo plugin (on Windows10)
wireshark foo plugin (on Windows10)
Pre-requisite
- able to build wireshark from source (following steps in https://www.wireshark.org/docs/wsdg_html_chunked/ChSetupWin32.html#ChWin32Build)
- Note: In case, you can't use the cmake from command prompt after installation, you need to first uninstall it and then install again using $ choco install cmake --installargs 'ADD_CMAKE_TO_PATH=System'
- All the build steps must execute under the vs2019 env CMD
Source of information
- https://code.wireshark.org/review/gitweb?p=wireshark.git;a=blob_plain;f=doc/README.plugins;hb=HEAD
- https://blog.fjh1997.top/2019/03/29/show-you-how-to-compile-the-c-language-plugin-for-wireshark-3.1-step-by-step-(windows-platform-2019-3-20)/
- Regarding the "Step four, recompile the wireshark source code", you have to first rerun the cmake before trying to build the plugin
- c:\Development\wsbuild64>cmake -G "Visual Studio 16 2019" -A x64 ..\wiresharkc:\Development\wsbuild64>msbuild /m /p:Configuration=RelWithDebInfo Wireshark.sln
Monday, October 28, 2019
k8s cluster on raspberry pi 4
(Note: All information is from the internet)
A personal note about installing k8s on Raspberry Pi4
 |
| A messy setup before got the cluster case.. |
A) On Master Node
1.# curl -
After install the docker, update the line /lib/
ExecStart=/usr/bin/dockerd -H fd:// --containerd=/run/containerd/containerd.sock --exec-opt native.cgroupdriver=systemd
- I use
-
-
#
Further connection has to jump from other 10.10.10.x nodes (via 192.168.1.11 / 10.10.10.11 to 10.10.10.10)
3.
4. Aim to use flannel as CNI, so start with
$
5.
sudo chown $(id -u):$(id -g) $HOME/.kube/config
6. Next keep the message of installation below:
---
You should now deploy a pod network to the cluster.
Run "
https://kubernetes.io/docs/concepts/cluster-administration/addons/
You can now join any number of control-plane nodes by copying certificate authorities
--
--
Then you can join any number of worker nodes by running the following on each as root:
--
---
7.
Since we need to connect to
One of the easier
$
clusterrole.rbac.authorization.k8s.io/flannel created
clusterrolebinding.rbac.authorization.k8s.io/flannel created
Check there is a new network interface create
8. Check the installation
pi@rbpi4-n0
NAME STATUS ROLES AGE VERSION
rbpi4-n0 Ready master 8m34s v1.16.2
pi@rbpi4-n0
9. Setup Worker nodes in section (B)
10. Setup dashboard
$ kube apply -f kubectl apply -f https://raw.githubusercontent.com/kubernetes/dashboard/v2.0.0-beta5/aio/deploy/recommended.yaml
11. Check status
pi@rbpi4-n0
NAMESPACE NAME READY STATUS RESTARTS AGE IP NODE NOMINATED NODE READINESS GATES
pi@rbpi4-n0
B) On Worker Node
1) Reset and start again
pi@rbpi4-n1
[
[
[
W1028 18:51:58.108270 24830
[
[
[
[
[
[
[
To avoid complication, advise to reboot the node and start again. Clean the /etc/cabinet files except the manifest
2) Join the cluster as worker node (not control plane node)
$
# root@rbpi4-n1
> --
[
[
[
[
[
[
[
[
This node has joined the cluster:
* The Kubelet was informed of the new secure connection details.
Run '
(Repeat the same for all worker
Tuesday, April 26, 2016
Steps to install Google play store on MiBOX3_Pro
Device:
manufacturer: Xiaomi
model: MiBOX3_PRO (MDZ-18-AA)
MIUI TV版本: 1.4.6(稳定版)
Prerequisites (Tools & Packages )
1) 360超级ROOT from http://root.360.cn/
PermRoot.apk
(Note: Use the 7.1.6 version that come with a green icon; newer version with cyan color icon doesn't work; Request older version from 360.cn forum or alternatively from www.apkhere.com/down/com.qihoo.permmgr_7.1.6_free. Use at your own risk )
(Note: Use the 7.1.6 version that come with a green icon; newer version with cyan color icon doesn't work; Request older version from 360.cn forum or alternatively from www.apkhere.com/down/com.qihoo.permmgr_7.1.6_free. Use at your own risk )
2) apk files from Gapps packages
67ae3a402c705c8ec97d6d05364e8697 gapps-5.1-arm64-2015-07-17-15-08.zip
Unzip and extract the following apk files:
- PrebuiltGmsCore.apk (from /arch/priv-app/PrebuiltGmsCore/)
- GoogleServicesFramework.apk (from /common/priv-app/GoogleServicesFramework/)
- GoogleLoginService.apk (from /common/priv-app/GoogleLoginService/)
- Phonesky.apk (from /common/priv-app/Phonesky/)
!! Rename the PrebuiltGmsCore.apk to GmsCore.apk !!
Example: jackpal.androidterm-1.0.70-71-minAPI4.apk
4) Google play store apk (from apkmirror etc)
5) Get ready a wireless/bluetooth keyboard
5) Get ready a wireless/bluetooth keyboard
Steps
0) You may want to follow the link to enable 3rd party apk installation and change the UI language: How-to change UI language
1) Root the device
1) Root the device
Install PermRoot.apk. Launch 360超级ROOT & click the <跳skip> on upper right corner to enter the main screen. Click the center BIG icon in middle to start.
2) Install terminal emulator and grant the root access
Install jackpal.androidterm-1.0.70-71-minAPI4.apk. Launch the emulator and switch to root user
> su - (Click Accept / 允许 when 360超级ROOT prompt)
# cd /
3) Remount /system rw
# mount -o rw,remount /system
4) Copy the Gapps apk files to respective locations
# cd /system/priv-app
# mkdir GmsCore GoogleServicesFramework GoogleLoginService Phonesky
# chmod 755 GmsCore GoogleServicesFramework GoogleLoginService Phonesky
#
# df (check your path to USB thumbdrive)
(Note: Modify the following path to your Gapps apks in thumbdrive)
# cp /storage/usbotg/usbotg-sda1/<path to gapps>/GmsCore.apk GmsCore/
# cp /storage/usbotg/usbotg-sda1/<path to gapps>/GoogleServicesFramework.apk GoogleServicesFramework/
# cp /storage/usbotg/usbotg-sda1/<path to gapps>/GoogleLoginService.apk GoogleLoginService/
# cp /storage/usbotg/usbotg-sda1/<path to gapps>/Phonesky.apk Phonesky/
# chmod 644 GmsCore/GmsCore.apk Google*/* Phonesky/Phonesky.apk
# sync
# reboot
5) Install the Google Play Store and YouTube from thumbdrive etc
----- That's all
DISCLAIMER. The instructions listed here can cause permanent damage to your device if applied incorrectly. Use at your own risk!
Information and hints from kane @ http://www.cnx-software.com/2016/04/12/xiaomi-mi-box-3-enhanced-pro-mediatek-mt8693-benchmarks-and-system-info/#comment-525919
Information and hints from kane @ http://www.cnx-software.com/2016/04/12/xiaomi-mi-box-3-enhanced-pro-mediatek-mt8693-benchmarks-and-system-info/#comment-525919
Subscribe to:
Comments (Atom)
KBTalking Pro Quickstart guide
Found a legacy card while doing the housekeeping... If you have a KBTalking Pro USB + Bluetooth mechanical keyboards and you have...

-
Steps to install Google play store on MiBOX3_Pro Device : manufacturer: Xiaomi model: MiBOX3_PRO (MDZ-18-AA) MIUI TV版本: 1....
-
Found a legacy card while doing the housekeeping... If you have a KBTalking Pro USB + Bluetooth mechanical keyboards and you have...
-
wireshark foo plugin (on Windows10) Pre-requisite able to build wireshark from source (following steps in https://www.wireshark.o...


